Microsoft Management Console (MMC) is an inbuilt feature in Windows operating system that lets you to manage snap-in on the go (you can run mmc.exe command to access it). The snap-ins are nothing but a basic component of a console. In the language of set theory, we can say that if a console is a set, then snap-in is its sub-set.
The various snap-ins available in Windows 8 or later editions are Event Viewer, Services, Group Policy Editor,Task Scheduler, Resultant Set of Policy (RSOP), Print Management, Windows Firewall with advance security,Performance Monitor, Device Manager, Disk Management etc.
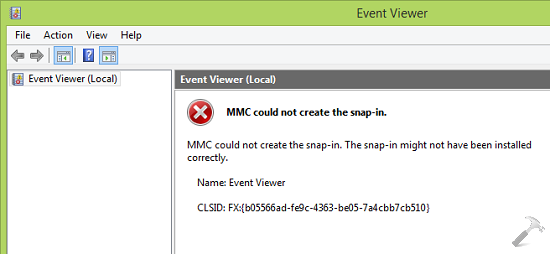
Sometimes, there may be a possibility of scenario in which some snap-ins may not work properly. Especially, if the registry configuration of a snap-in is broken (note that Registry Editor is not a snap-in), the snap-in initialization would fail. In this case, you’re likely to get following error message (an specific message in case of Event Viewer):
MMC could not create the snap-in. The snap-in might not have been installed correctly.
Name: Event Viewer
CLSID: FX:{b05566ad-fe9c-4363-be05-7a4cbb7cb510}
 In some cases, you can also receive:
MMC cannot initialize the snap-in.
If you observe the first error message, at last line there is a hint which can help us to identify the cause of this issue. In our case, the last line of error message is CLSID: FX:{b05566ad-fe9c-4363-be05-7a4cbb7cb510}which helped to us investigate futher about this problem. We started our research by searching this string inRegistry Editor. Consequently, we found that issue get resolves with fixing the corresponding registry key forEvent Viewer snap-in.
Here are the steps, you need to follow in order to overcome this hiccup:
The various snap-ins available in Windows 8 or later editions are Event Viewer, Services, Group Policy Editor,Task Scheduler, Resultant Set of Policy (RSOP), Print Management, Windows Firewall with advance security,Performance Monitor, Device Manager, Disk Management etc.
Sometimes, there may be a possibility of scenario in which some snap-ins may not work properly. Especially, if the registry configuration of a snap-in is broken (note that Registry Editor is not a snap-in), the snap-in initialization would fail. In this case, you’re likely to get following error message (an specific message in case of Event Viewer):
MMC could not create the snap-in. The snap-in might not have been installed correctly.Name: Event ViewerCLSID: FX:{b05566ad-fe9c-4363-be05-7a4cbb7cb510}
In some cases, you can also receive:
MMC cannot initialize the snap-in.
If you observe the first error message, at last line there is a hint which can help us to identify the cause of this issue. In our case, the last line of error message is CLSID: FX:{b05566ad-fe9c-4363-be05-7a4cbb7cb510}which helped to us investigate futher about this problem. We started our research by searching this string inRegistry Editor. Consequently, we found that issue get resolves with fixing the corresponding registry key forEvent Viewer snap-in.
Here are the steps, you need to follow in order to overcome this hiccup:
FIX : MMC Could Not Create The Snap-in. The Snap-in Might Not Have Been Installed Correctly
Registry Disclaimer : Making mistakes while manipulating registry could affect your system adversely. So be careful while editing registry entries, also its better to create a System Restore point before proceeding.
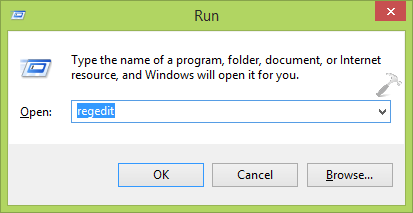
1. Press  + R and put regedit in Run dialog box to open Registry Editor (if you’re not familiar with Registry Editor, then click here). Click OK.
 2. In the left pane of Registry Editor, navigate to following key:
HKEY_LOCAL_MACHINE\SOFTWARE\Microsoft\MMC\SnapIns\FX:{b05566ad-fe9c-4363-be05-7a4cbb7cb510}
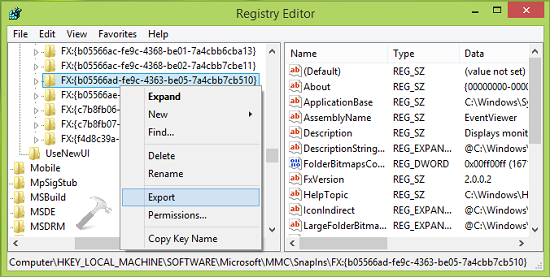 3. In the above shown, right click on the FX:{b05566ad-fe9c-4363-be05-7a4cbb7cb510} and select Export. This will let you to backup the registry key into .reg file. Next, right click on same key and this time selectDelete.
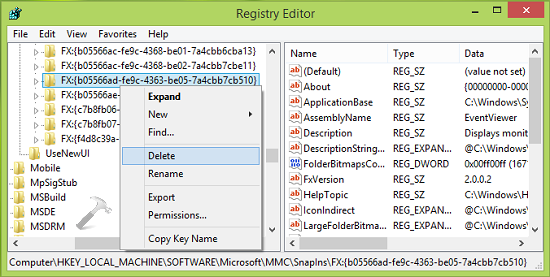 4. Finally, in the confirmation box, select Yes to delete the registry key finally. Close the Registry Editor and reboot your system.
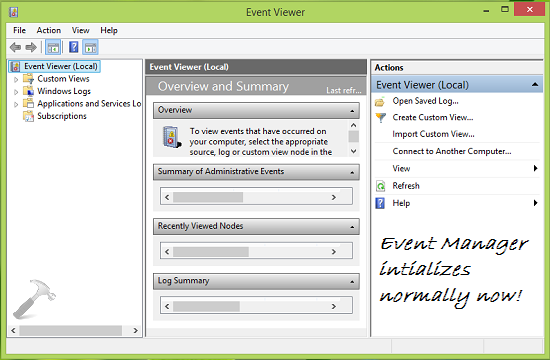
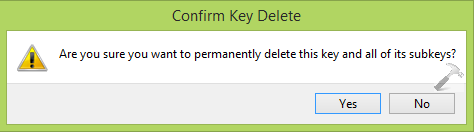 After restarting the machine, Windows would automatically generate the required registry configuration for the Event Manager and this solves the problem. So you can open Event Viewer and find it working as expected:
 In the similar fashion, you can solve the similar error messages for different CLSID‘s for different snap-ins. Go here if you get this snap-in may not be used with this edition of Windows error.
Registry Disclaimer : Making mistakes while manipulating registry could affect your system adversely. So be careful while editing registry entries, also its better to create a System Restore point before proceeding.
1. Press + R and put regedit in Run dialog box to open Registry Editor (if you’re not familiar with Registry Editor, then click here). Click OK.
+ R and put regedit in Run dialog box to open Registry Editor (if you’re not familiar with Registry Editor, then click here). Click OK.
2. In the left pane of Registry Editor, navigate to following key:
HKEY_LOCAL_MACHINE\SOFTWARE\Microsoft\MMC\SnapIns\FX:{b05566ad-fe9c-4363-be05-7a4cbb7cb510}
3. In the above shown, right click on the FX:{b05566ad-fe9c-4363-be05-7a4cbb7cb510} and select Export. This will let you to backup the registry key into .reg file. Next, right click on same key and this time selectDelete.
4. Finally, in the confirmation box, select Yes to delete the registry key finally. Close the Registry Editor and reboot your system.
After restarting the machine, Windows would automatically generate the required registry configuration for the Event Manager and this solves the problem. So you can open Event Viewer and find it working as expected:
In the similar fashion, you can solve the similar error messages for different CLSID‘s for different snap-ins. Go here if you get this snap-in may not be used with this edition of Windows error.
Task Scheduler CLSID CODE:
HKEY_LOCAL_MACHINE\SOFTWARE\Microsoft\MMC\SnapIns\FX:{c7b8fb06-bfe1-4c2e-9217-7a69a95bbac4}
In the above shown, right click on the FX:{c7b8fb06-bfe1-4c2e-9217-7a69a95bbac4} and select Export. This will let you to backup the registry key into .reg file. Next, right click on same key and this time selectDelete.
Finally, in the confirmation box, select Yes to delete the registry key finally. Close the Registry Editor and reboot your system.
After restarting the machine, Windows would automatically generate the required registry configuration for the Event Manager and this solves the problem. So you can open Event Viewer and find it working as expected:
Windows Firewall with Advanced Security CLSID CODE :
HKEY_LOCAL_MACHINE\SOFTWARE\Microsoft\MMC\SnapIns\FX:{b05566ac-fe9c-4368-be02-7a4cbb7cbe11}
In the above shown, right click on the FX:{b05566ac-fe9c-4368-be02-7a4cbb7cbe11} and select Export. This will let you to backup the registry key into .reg file. Next, right click on same key and this time selectDelete.
Finally, in the confirmation box, select Yes to delete the registry key finally. Close the Registry Editor and reboot your system.
After restarting the machine, Windows would automatically generate the required registry configuration for the Event Manager and this solves the problem. So you can open Event Viewer and find it working as expected:
All the BEST....


