
Both notebook and desktop PCs occasionally require BIOS updates. When you visit a vendor's Web site (either the PC mfgr or the BIOS maker) and discover a new BIOS with features you want, or upgrades require a new BIOS, it's time to put all the ingredients together, make a backup of the current BIOS, and then flash the EEPROM where the BIOS resides with the new version. Afterward, a little clean-up is also usually required.
Warning! Problems or failures during the BIOS flashing process can do serious harm to a PC. Don't flash unless you really must, and never flash without making a backup and rounding up necessary repair tools. With a little luck, your BIOS System information will look like this screenshot, and reflect your successful addition of a new version to your PC.
Step 1: Round up the ingredients

The best place to get a BIOS update is from your PC manufacturer's Web
site, on the downloads page for your notebook or desktop PC, if you
purchased a complete system, or for your motherboard if you built your
own system (or purchased a "white box" PC from somebody else who builds
them from stock parts).
A good way to find BIOS versions and info is to use Google to search using strings like "download <make><model> BIOS" for complete systems, or "download <make> <model> for motherboards. Thus, for the MSI PR200 notebook I just updated, I searched on "download MSI PR200 BIOS." This took me right to the MSI product page for the PR200 where the latest BIOS versions for Vista and XP were both available.
You'll also need a USB Flash Drive (UFD) formatting tool that can create a bootable DOS image on that drive. This requires a special formatting tool, and DOS source files to make the drive bootable. For this task, your best bet is a tool called the HP USB Disk Storage Format Tool, V2.1.8. It not only formats UFDs to FAT or FAT32, it can also copy DOS boot files from any target directory you supply to this tool. Extreme Overclocking has a readily available download link. The .exe file is self installing, and adds the program to your Program Files directory by default.
Of course, that means you also need a minimal set of DOS boot files (command.com, io.sys, and ms.sys at a minimum). Extreme Overclocking also makes the Windows 98 system files available in a download as well. Grab these files and put them in their own directory. I called mine DOS-boot.
Step 2: Run The HP Format Tool

Run the HP UFD format utility (this program usually resides in the
Programs listing under the Start menu beneath a heading that reads
"Hewlett-Packard Company.") Select the UFD drive you wish to use
(warning! this process destroys its entire contents; if you need any
files from this device, copy them to a hard disk before you start this
process). Click the Quick Format checkbox, and also the Create a DOS
startup disk checkbox, then click the browse button to the right of the
textbox to identify the directory where you unzipped the Windows 98 DOS
files. This produces a screen like the one shown in the first screencap.
Step 3: Format and Copy Files to UFD

Step 4: Let the HP tool do its work

The program creates a partition on the drive, marks it active (to make
it bootable), then formats the drive and copies all the files from your
DOS files directory. The whole process took less than 20 seconds for the
2 GB UFD I used to shoot these screenshots. Note: this is much faster
than the XP or Vista format utility built into Windows Explorer; this
tool is handy whenever you need to reformat any UFD. This produces the
final report screenshot, which provides info about disk structure and
layout.
Step 5: Copy the BIOS files to your UFD

Now, you must unzip the BIOS download and copy the necessary files onto
the UFD as well. For my notebook PC, these came in an archive named
1221_148.zip. This archive includes all the files you need for a DOS
BIOS flash, and only those files, as shown in the WinZip window. Simply
extract these files onto the UFD and you're more or less done with prep.
You'll want to inspect your BIOS download carefully, however, many of
them include Windows BIOS flashing tools and other data files as well,
along with a readme file to tell you what's what. Be sure to find out
which files the DOS flash needs and copy only those files to the UFD.
Step 6: Reboot your system, use boot device menu


Next, you must reboot your system so you can start it up from the UFD. Be sure to leave your UFD inserted into the machine. As most systems boot, they provide info about special control keys to let you change its boot behavior. On AMI BIOS systems the following conventions usually apply
1. Strike the delete (DEL) key to enter BIOS setup
2. Strike the tab (TAB) key to show POST and boot status info
3. Strike the F11 key to change the boot drive order one time only
If you strike F11 you'll see a list of devices from which your system can boot, with the current default selection highlighted. Use the arrow keys to move up or down, then hit Enter to select your DOS boot UFD.

If F11 doesn't work for you, strike DEL to enter the BIOS Setup program. You'll see a section in the BIOS program labeled boot, with various entries. Pick the one labeled Hard Disk Drives. In the resulting screen, select the first item in the list, then hit Enter. In the item window that pops up in response, highlight the UFD from which you wish to boot. Then hit F10 to save this change, and hit enter to commit the change to the BIOS and restart the machine.
Step 8: Check your boot directory


Step 9: Save your current BIOS!!

To make the backup, we'll use the flash utility included on the UFD. It's named AFU414sD. You make a backup by typing this command at the C:\> prompt on your PC: AFU414sD AMIBOOT.ROM /O (the final character is a capitol O, not the number zero). This copies your existing BIOS into a file named AMIBOOT.ROM (this name is important because if the new BIOS causes your PC to stop booting complete, AMI supports an emergency repair maneuver whereby you insert a floppy disk into your system, turn the power on, then hold down the CTRL and HOME keys until the PC beeps once to tell you it's loaded that BIOS file). Alas, this doesn't work on notebooks because so few have floppy drives (I experimented to see if this technique worked with a UFD, and it does not).
Save the AMIBOOT.ROM file onto another drive as soon as you finish flashing the BIOS in the next step. This is definitely one case where your backup needs a backup!
Step 10: Flash that BIOS!
If you get in trouble and the BIOS flash fails for any reason, as long as your system will still boot (at least to a UFD) you can probably get yourself out of trouble by reflashing the BIOS with your backup. You might want to search the Web for information on any error messages the BIOS flash utility shares with you, should that occur. You will also find the Wim's BIOS site chock full of useful information and helpful tools and diagnostic downloads.
Should trouble rear its ugly head, it's important not to panic. If you can bail yourself out, you can always call the motherboard or system maker's technical support staff for help, or post to their online message forums. The people on the forums at Wim's BIOS are also incredibly helpful and knowledgeable as well. Just don't go bonkers and try to start changing a bunch of stuff until you have a very good idea of what to do next. If you try to restore your old BIOS and can't get it to work, that's a sign it's time to ask for help.
Step 11: Post Install Clean-up

For most notebook PCs, that's fine because they aren't often subject to major BIOS tweaking anyway. For desktops, especially overclocked or tweaked systems, if your BIOS, PC, or motherboard maker doesn't offer a BIOS settings save/restore function (many of them do, but some of them don't) you should go through all the screens in your BIOS setup and record the settings (or photograph them, as I did for this tutorial). Once you go back to the defaults, you'll want to reboot again, and restore the settings you want, rather than the plain-vanilla ones that the factory fresh reinstall will impose.
Step 12: Take Your Updated BIOS for a Spin
OK, once you've restored the BIOS settings to where you want them to be, you're ready to try out your revised computing environment. Realistically, this means getting back to work, but keeping an eagle eye out for symptoms of trouble. Slower performance, missing devices, system instability, and even different sounds can all point to BIOS problems, especially in the immediate aftermath of a BIOS update. Just be ready to re-flash and roll back to the original, and you should be OK. If your experience is the same as 99% of those who update their BIOS for a good reason, you'll notice none of these things, and your system may be even snappier than it was before. Enjoy!


1. Strike the delete (DEL) key to enter BIOS setup
2. Strike the tab (TAB) key to show POST and boot status info
3. Strike the F11 key to change the boot drive order one time only
If you strike F11 you'll see a list of devices from which your system can boot, with the current default selection highlighted. Use the arrow keys to move up or down, then hit Enter to select your DOS boot UFD.

If F11 doesn't work for you, strike DEL to enter the BIOS Setup program. You'll see a section in the BIOS program labeled boot, with various entries. Pick the one labeled Hard Disk Drives. In the resulting screen, select the first item in the list, then hit Enter. In the item window that pops up in response, highlight the UFD from which you wish to boot. Then hit F10 to save this change, and hit enter to commit the change to the BIOS and restart the machine.
Step 8: Check your boot directory

Here you run the DOS dir command to list the files on the UFD, just to remind yourself about what to do. MSI thoughtfully provides a batch file named FLASH.BAT, which I will run in the next step to actually flash the BIOS. Here, you get a visual reminder that this is the right tool for that upcoming job.
Step 9: Save your current BIOS!!

Before you can flash the existing BIOS, which really means wiping out the old one and replacing it with a new one, you must back that existing BIOS up. Why? Because if anything goes wrong with the new BIOS you're going to install, you must have some way to return to the old version. This step lets you create a backup before making any changes. It's an absolutely essential CYA maneuver any time you mess with your PC's BIOS. Get in the habit!
To make the backup, we'll use the flash utility included on the UFD. It's named AFU414sD. You make a backup by typing this command at the C:\> prompt on your PC: AFU414sD AMIBOOT.ROM /O (the final character is a capitol O, not the number zero). This copies your existing BIOS into a file named AMIBOOT.ROM (this name is important because if the new BIOS causes your PC to stop booting complete, AMI supports an emergency repair maneuver whereby you insert a floppy disk into your system, turn the power on, then hold down the CTRL and HOME keys until the PC beeps once to tell you it's loaded that BIOS file). Alas, this doesn't work on notebooks because so few have floppy drives (I experimented to see if this technique worked with a UFD, and it does not).
Save the AMIBOOT.ROM file onto another drive as soon as you finish flashing the BIOS in the next step. This is definitely one case where your backup needs a backup!
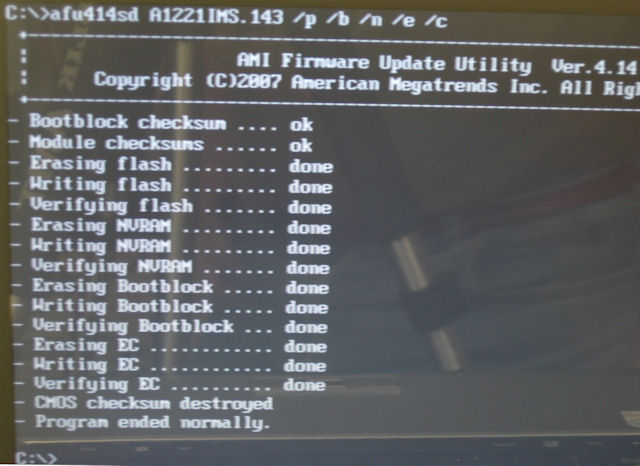
Step 10: Flash that BIOS!
After all the work that's gone before, this is pretty anticlimactic: all you have to do is type the name of the batch file, FLASH, at the command line, then hit return and it does the rest of the work. You really, really want to see a screen shot like this one when the process is finished because anything else could mean big trouble. That's why you should make sure any notebook is plugged in to a wall socket, and never flash a BIOS during a thunderstorm or at other times when the power might go out.
If you get in trouble and the BIOS flash fails for any reason, as long as your system will still boot (at least to a UFD) you can probably get yourself out of trouble by reflashing the BIOS with your backup. You might want to search the Web for information on any error messages the BIOS flash utility shares with you, should that occur. You will also find the Wim's BIOS site chock full of useful information and helpful tools and diagnostic downloads.
Should trouble rear its ugly head, it's important not to panic. If you can bail yourself out, you can always call the motherboard or system maker's technical support staff for help, or post to their online message forums. The people on the forums at Wim's BIOS are also incredibly helpful and knowledgeable as well. Just don't go bonkers and try to start changing a bunch of stuff until you have a very good idea of what to do next. If you try to restore your old BIOS and can't get it to work, that's a sign it's time to ask for help.
Step 11: Post Install Clean-up

The first time you reboot after updating your BIOS, you'll get an error message from the BIOS load utility that says something like "CMOS Checksum Bad." Don't fret: this is normal, and merely reflects the fact that you've made changes to the BIOS (and hence also to its checksum). Strike whatever key the PC tells you to enter the Setup utility (F1 on my notebook, in this case). Arrow right over to the Exit screen where you'll find a setting that reads "Load Setup Defaults." Hit enter, and the machine will reload the same defaults that were installed at the factory.
For most notebook PCs, that's fine because they aren't often subject to major BIOS tweaking anyway. For desktops, especially overclocked or tweaked systems, if your BIOS, PC, or motherboard maker doesn't offer a BIOS settings save/restore function (many of them do, but some of them don't) you should go through all the screens in your BIOS setup and record the settings (or photograph them, as I did for this tutorial). Once you go back to the defaults, you'll want to reboot again, and restore the settings you want, rather than the plain-vanilla ones that the factory fresh reinstall will impose.
Step 12: Take Your Updated BIOS for a Spin
OK, once you've restored the BIOS settings to where you want them to be, you're ready to try out your revised computing environment. Realistically, this means getting back to work, but keeping an eagle eye out for symptoms of trouble. Slower performance, missing devices, system instability, and even different sounds can all point to BIOS problems, especially in the immediate aftermath of a BIOS update. Just be ready to re-flash and roll back to the original, and you should be OK. If your experience is the same as 99% of those who update their BIOS for a good reason, you'll notice none of these things, and your system may be even snappier than it was before. Enjoy!


