Friday, 23 September 2011

Sharecash Free Downloading Sept 2011 : Bypass Sharecash Survey


Sharecash Downloader Software to Bypass Sharecash Survey 

               After long break from Sharecash article, today I am back with a another Sharecash Downloader and Sharecash Premium Links Generater site. In this article i have provided link to download Sharecash Downloader software and Sharecash premium links generate site domain name for downloading from sharecash without completing tedious surveys which is very irritating for peoples.

So, you can use this Sharecash Downloader software or premium Sharecash links generate site to download files from Sharecash without completing any surveys.... just read on.


Step 1:  Free Download Sharecash Downloader software to bypass Sharecash.
             Password: www.wildhacker.com

Step 2:  Extract and run this Sharecash downloader on your computer to see:


Step 3: Select the mirror website for your link (MUST).

Step 4: Insert your link then Click Import Link.

Step 5: Wait till you get this,


Step 6: Then click Download.

Proof :

Requirements :
NET.Framework 2.0 version and above

Virus Scan:
File name: $harecash Bypasser & Downloader V1 [beta].exe
Submission date: 2011-09-21 04:16:01 (UTC)
Current status: finished
Result: 3/ 44 (6.8%)
http://www.virustotal.com/file-scan/report.html?id=2c3a3b402d19bb9bcc0dfb4e3114f5e647e4b23913853221a8d4610ea33b5191-1316578561

Sharecash downloader will start downloading your file from Sharecash without requiring you to complete sharecash surveys.

Premium Sharecash, Cashfile, FileIce Links Generate

Step 1: Goto linkpremiumgenerator site.


Step 2: Click on "Get Premium" button, new window will open , in that window click on "Share to Get" button. Now using Twitter or Facebook account login to see,


Click on " Update my Status " button ,then hit on " Access link " to see,


Step 3 : Now Enter your sharecash link and hit on Submit button, in few second " Download " button will get visible, click on it and enjoy free downloading..

Thus, you are able to bypass Sharecash survey.

So friends, I hope this
Sharecash downloader software and sharecash premium link generator site will help you to bypass Sharecash.Got problems while using any one of them ??? Not able to bypass Sharecash using this hack??? then write your problem in comments with :

Enjoy free Sharecash downloader to bypass Sharecash survey...

Lock Hard Disk with a Password

 
Secret Disk is a software to create secure hard disk on your computer which may be locked and unlocked with a password to store your private files. When locked Secret Disk doesn't appear in Windows system and completely invisible with all contents.

When unlocked Secret Disk appears as usual (one more) hard disk on your PC. You can keep any files and folders there as usual. Works with any third-party software, games and media, and no additional hardware required!

Lets say you share computer, but still want to have some private files on it. Or you just dont want accidental person (like computer tech repair) find some secret files on your PC. There is a lot of software that can encrypt/decrypt your secret files but it can take a lot of time if you have many. Our solution lets you have separate disk on your PC which may be locked and unlocked with a password within one second! Moreover, when locked it is invisible in the Windows system.

How it works?

Just install Secret Disk and choose a password. Then, start Secret Disk. Press unlock button, enter your password and you will see one more disk X: appears in My Computer area. You can now start working with your private files to save them to secret disk X. When you need protection just click icon in the tray area to lock secret disk and it will disappear within one second with all contents! When you want your files back, open Secret Disk tool, press Unlock button and enter your password. Its easy!

Power failure

In case of power (or Windows) failure secret disk will be locked on next system boot. It happens automatically because secret disk information are kept in memory and if memory fails secret disk will not be restored on next system logon. This adds maximum protection for your files located on the disk.

100% Compatible

Secret disk compatible with any files and folders. You can work with it as usual, as with your My Documents folder.

Security level

Secret Disk does not encrypt any files. Secret Disk only limit access to secret location with your files and ties virtual disk to it when needed. This will provide you enough security to hide your files from accident person taking control over your PC, but doesn't guarantee top level security (because files stored on your disk 'as is', without encryption).
Enjoy.......

Sunday, 18 September 2011

Lock Keyboard, Mouse, Optical Drive Doors Of Windows PC For Cleaning Or Protection From Kids


Sometimes while using our computer or laptop, we need to clean the screen of our system, and sometimes keyboard and mouse also. It is important to clean the keyboard regularly as lots of dust gets accumulated on it regularly. Cleaning can be done when the system in turned off, but if it there is something running on the system and it can’t be shutdown. In that case while cleaning the system you can land yourself into trouble if you press several unwanted keys unknowingly, and you can end up deleting some important data. I have a solution to your problem, a Freeware named Toddler Keys for Windows.


After you will download and install this application you will se a TK icon in the system tray when you will right click on this icon this dialog box will open. It has options to Disable power button, Lock Drive Doors, Lock Keyboard and Lock Keyboard/Mouse. The two options Disable Power Button and Lock Drive Doors are automatically enabled.


This is the Manage Pictures and Sound Option menu of the application which is used to add the pictures and songs, when the keyboard is disabled the pictures are shown and the songs are played as the keys are pressed on the keyboard.


This is the Options menu for the Toddler Keys application. It gives you the option to practically lock all the drives that you can have on your system.  It also gives you the options to lock the keyboard and mouse automatically after a set interval of time that can be set in the software.  you can set a word which can be typed in when you need to enable your keyboard and mouse. It can also serve as a security software that will unlock the keyboard and mouse after you will enter the word that you have set. You can also choose to show you the message which tells you to type a specific word to unlock the keyboard and mouse, which when disabled the software prevents your system being accessed by somebody else as only you would know what to type that will unlock the keyboard and mouse.

The software is very useful in case you have child who will press the keys once you are gone somewhere. In that case you can enable the options to show images and play sounds whenever a key is pressed which prevents the access and also provides the entertainment for your child. The images and sounds can be selected in the Manage Pictures and Sounds Options.

Download Toddler Keys

Prevent Virus Attacks From Infected Pen Drives and Memory Cards


Security is one of the most common concerns for almost every user who uses the computer system irrespective of the domain in which they work. Threats, malware, viruses and other infected files may harm the system very easily. There may be lot of sources for such kind of infected files but, usually they come from some external hard-disks or USB drives attached with the system. So, in order to avoid this, user needs an application which may protect the system against such infected files and may inform the user if any such kind of malware is detected in the computer. For this, we recommend one of the latest developed utilities, which serve this purpose and provides an extra layer of security for the user against such external threats.

Antirun is basically a small, useful and a freely available tool that brings a number of protection options for the user, thus ensuring the security for the system against any kind of external threats which may occur from removable media devices such as USBs, SD Card, External hard drives, digital cameras, phones, etc. This smart utility automatically detects and scans the devices which are plugged into your computer and if there is any threat found in the device then it informs you as soon as it is detected. If we look further down that we may observe that these threats are basically identified by the attributes of external media files which may be the ones which may be trying to activate themselves. So, once this smart tool detects a virus or an infected file, it provides an option for the user by which one can remove the identified threat. So, in this way all the external devices connected to the computer at one time are displayed by the utility and that too all in separate tabs thus making it lot easier to manage different external devices and thus to detect which one of them contains that threat.


image


Along with all the features and functionalities discussed above this tool also enables the users to avoid opening their media devices. It also supports the simple drag and drop feature so that the files can be copied to the destination device without having to open it directly and which makes it user-friendly. One may also use this tool to simply open the devices in a lot secure manner in order to prevent any kind of malware which may infect the system. One of the most important thing about this utility which must be noted is that it does not interfere at all with the existing antivirus program running in the system and thus it can be launched even before you plug-in an external device. 

As already mentioned, this smart utility makes it really convenient for the user to copy the files and folders to external media devices without having to risk opening the device and activating a malware agent. As said earlier, this can be done by simply dragging the files or folder directly on to the Antirun dialog box. So, in order to try it out and to observe more of its functionalities, one may download it from the below given link.

Download Antirun

Friday, 16 September 2011

Turn a USB Flash Drive into a Bootable Windows 7 Installer

 Turn a USB Flash Drive into a Bootable Windows 7 Installer
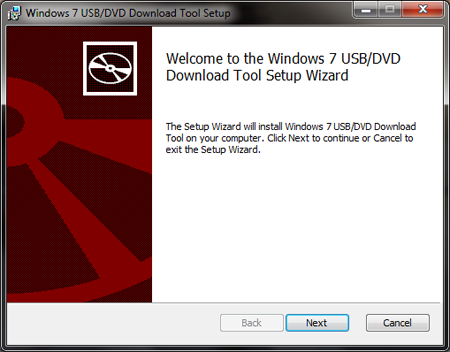
Hi all users, many of you asked us about some idea on how to install Windows 7 OS from USB thub drive (Pen Drive) so we found this easiest way to do so is by using the tool Microsoft offers, cunningly named the Windows 7 USB/DVD Download Tool. To get started,download the software and install it.

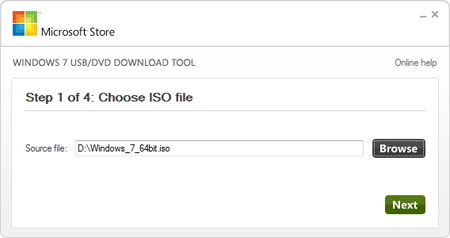
Once it is installed, it should create an icon on your desktop, so double-click that to open. If you can't find it, use the search function in the Start Menu with a keyword like "USB." Launching it should give you the above screen, and step one is to find the Windows 7 .ISO file. The tool only accepts .ISO images, so we recommend that you convert yours if it's in a different DVD image format.
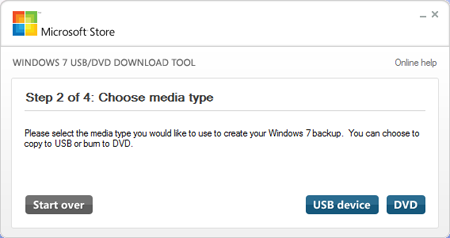
Step two is straightforward: simply choose USB device. 
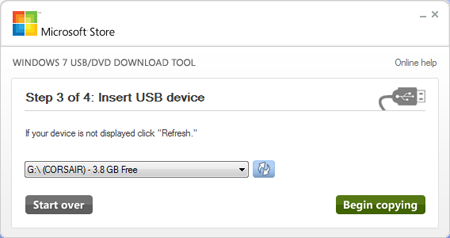
In step three, all you have to do is make sure that you are choosing the correct USB device. If you have other data on the device, move it to your hard drive, another USB device, or somewhere else before proceeding.
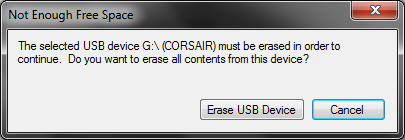
The tool will prompt you if it detects data on the device. Once your data is backed up elsewhere, click Erase USB Device.
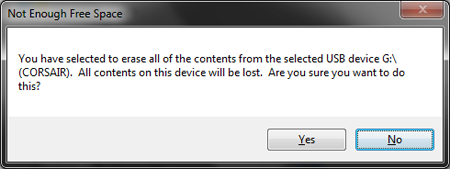
You will get another prompt warning you that all the data will be wiped. Click Yes to continue.
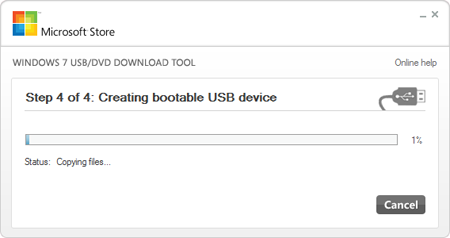
The format will be very quick, while the copying of the files will take a little bit more time (about 10 to 15 minutes).
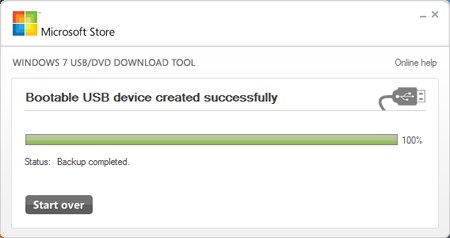
Once the process is complete, you should get the above confirmation message. At this point you can close the tool and use the USB drive to install Windows 7. Remember that you'll have to choose to boot from the USB drive. Before doing so, you may want to open up the USB drive and double click on setup.exe to see if everything looks okay. 

Enjoy.......
Related Posts Plugin for WordPress, Blogger...
x

Get Our Latest Posts Via Email - It's Free

Enter your email address:

Delivered by FeedBurner